HOW TO LIST AND VERIFY ALEXA IN WEB OR BLOG
Who does not know alexa rank? Yes, the alexa rank site is a site that analyzes the ranking of
websites from around the world. most of the webmasters use alexa rank as a benchmark of the
success of the website that he manages. The webmasters are competing to get the top possition
of millions of sites on this world.
Alexa itself provides an assessment based on site traffic owned. The more traffic to the site,
the ranking in alexa rank will be better. If in PA, DA or PR, the best rank is the one that
has the greatest value, then the best ranking alexa rank is ranked which has the smallest
value, just like the class champion. Currently the best alexa ranking is still held by
google.com.

To get detailed information about the development
of your site, of course you need to register your site or blog to alexa.
Although alexa is not the only benchmark for success of a site or blog, but at
least you can know the progress of your site from day to day, week to week and
month to month through methods applied by alexa by registering the site or
blog.
Alexa itself provides various types of packages
that you can choose from basic start, insight, advanced and advanced high
traffic. All the packages have different prices and features. You can try these
packages for free for 7 days and then paid at a price that has been determined.
In addition to the various packages mentioned
above, sebenanya alexa also provide free services (free). It's just lately,
after the alexa website alteration appearance, the free service seems to
disappear just like that. As a result, it is not uncommon for people to assume
that the free alexa service has been removed by alexa parties. But you do not
have to worry, this time I will give you the latest way to register your
website or blog to alexa for free.
Here is how to list and verify website or blog in
alexa for free:
How To List Free Alexa:
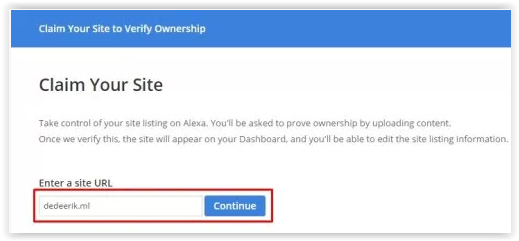
1. Log in to the following URL to be able to claim to the site or blog you have:
http://www.alexa.com/siteowners/claim
2. Enter the URL of your website or blog box provided, then click continue
3. On the next page you will be prompted to login or register
first. For those who have never signed up in alexa, you can list with an email
address or via facebook. I suggest you to choose through facebook course, so
the registration process can be more easily and quickly.
4.
Next you will be asked to verify the site or blog with
the method provided.
How to Verify Alexa on Website or Blog:
Alexa provides 3 ways or methods to verify your
website or blog that you have. But of the three methods, only 2 methods you can
use for free. One method available, can only be used for alexa users paid
version.
The following are the two alexa rank verification
methods:
1)Upload an alexa verification file to your site's
root directory. This method can be considered pretty troublesome, but
also can last long. This means that if you use wordpress and want to switch
themes, then you no longer need to re-verify your alexa.
Here
are the details of how to verify using alexa file upload method:
a. First download the alexa file provided, then
upload the file into the root directory of your site. (usually the site
directory is htdocks or public_html directory). To upload the file, you can use
FTP Client filezilla or something else.
b. When finished uploading to your site directory,
then you just click the "verify the file on your site" to continue
the verification process.

2. Add an alexa verification
ID to your homepage.
This method I use most often, because it is more
simple and easy. I usually do alexa ID verification directly via wordpress seo
plugin by yoast. In addition to verification ID via plugin, this second method
can also be done by adding a meta tag on the homepage. Therefore that is
usually the method is the most widely used by the owners of the blog,
considering not necessarily every blog can do the verification with the first
method.
Here's how to verify alexa via alexa
verification ID:
1.
For those of you self hosted wordpress users and use
plugins that support alexa verification, such as wordpress seo plugin by yoast,
the way of verification is to copy and paste the alexa ID given into the
plugin. Then click "verify my ID"

2. for those who do not use the plugin, you can copy
the meta tag provided and please insert the meta tag under <head>. After
that please click "verify my ID"

If you have
verified using one of the two methods above, then the next step is to provide
information or data needed for your site or blog. The trick is to click My
Dashboard-> Site Management-> Edit Site Listing

Site Title: Fill in
the title of your site or blog.
Site Description:
Fill in with your site description.
Site Owner: Fill in
the name of the site owner.
Address: The
address of the site owner.
City: City site
owner.
State / Province:
Province site owners.
Zip Code: Fill in
the zip code.
Country: The
country of the site owner.
Public email: Fill
in the email address of the site owner.
Select the county
for your rank: Please select the target country for your site.
Do not forget to
click save to save the data that you fill
No comments:
Post a Comment